Xcode Custom Project Templates: Basics

At Showoff we work continuously to provide fast and cost effective development services to our clients without compromising on the Showoff standard. Over the course of our journey we have standardised most things that impact every project that we do. These include things like coding conventions, architecture, project structure and SCM, to name a few. All of this standardisation has lead to some repetitive work for each project. We recently decided to develop our own Xcode project templates in an effort to remove these repetitive steps. This blog post will highlight some of the lessons learned along the way and provide a small example for you to build on. There is a lot of trial and error involved in this process since Apple has never documented it. This guide will require Xcode 8.
Project Template Architecture
Xcode project templates are built on a hierarchy. Apple defines some base templates that are then used by other templates. These base templates can be found at:
/Applications/Xcode.app/Contents/Developer/Library/Xcode/Templates/Project Templates/Base
It is worth going through these base projects as they will give you a good idea on how to structure your own template(s) and showcase some of the possibilities that are available. The concrete templates (the ones used in Xcode) that are based on the base templates are available in Xcode at:
/Applications/Xcode.app/Contents/Developer/Platforms/iPhoneOS.platform/Developer/Library/Xcode/Templates/Project Templates/iOS
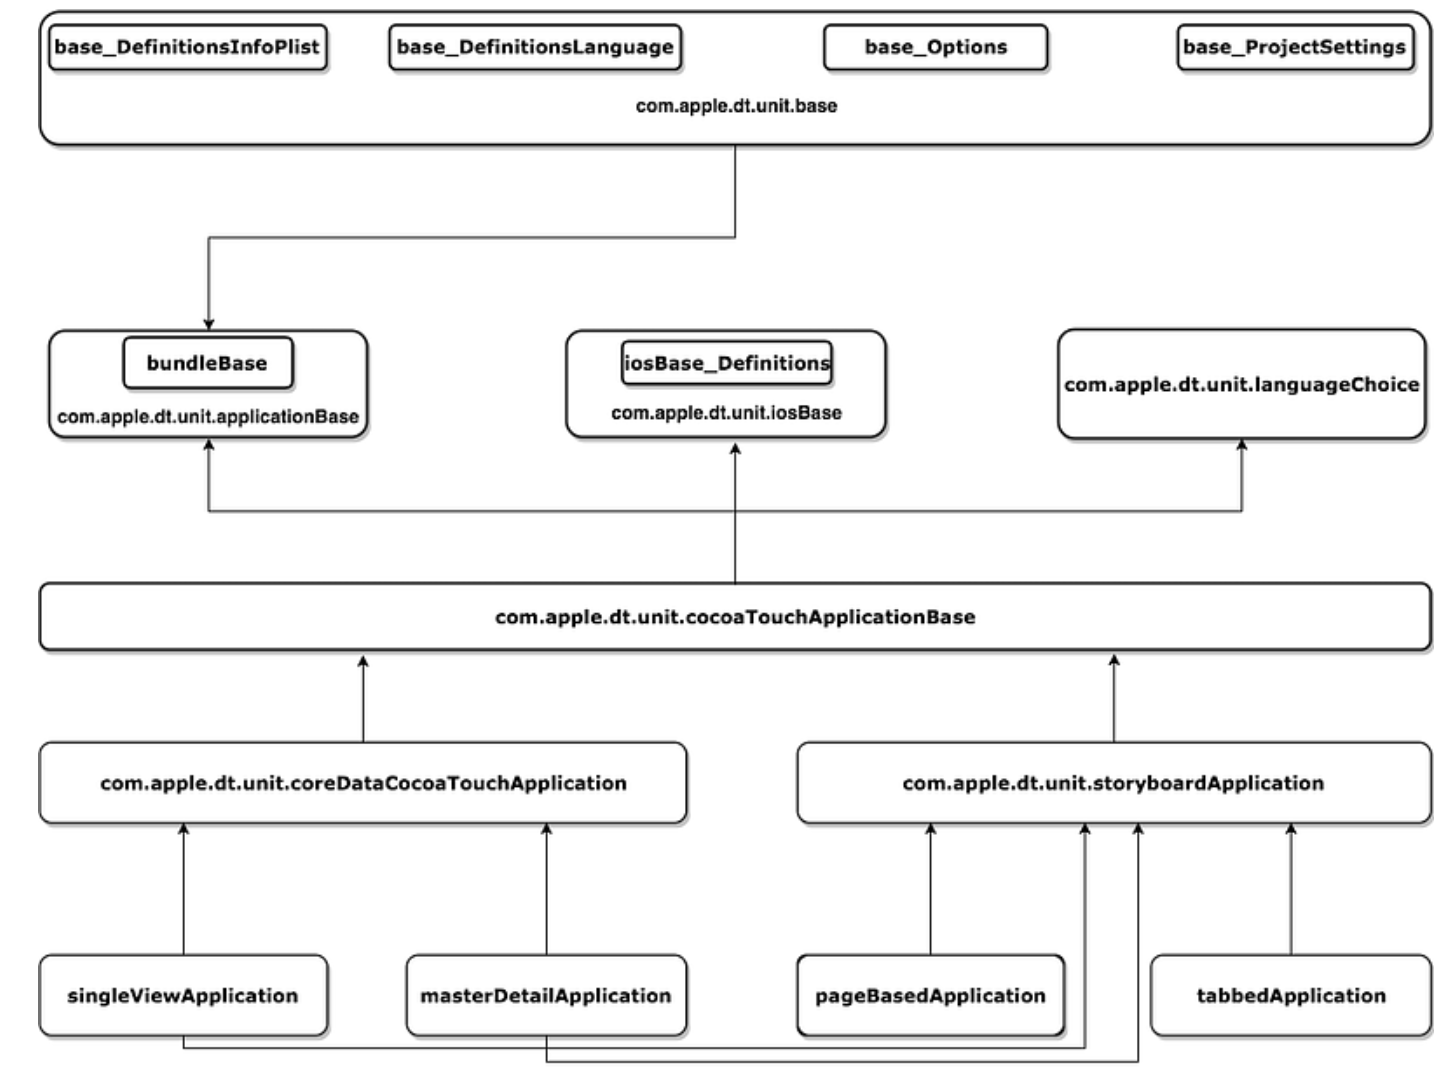
These templates provide the best starting point when learning to create your own templates. The hierarchy of templates is a good concept to use to modularise your own template, where necessary, as they tend to be verbose. The diagram below shows the template hierarchy of the Single View Application template.
Creating A New Template
We will be creating a custom template based on the Cocoa Touch Application Base template. There are 2 ways of going about this.
Method 1
We can make a copy of the existing template and use it as a starting point. This is advantageous when trying to learn the ins and outs of how Xcode templates work. You can simply add/edit/remove things from the existing template to see the impact.
- Copy one of the existing templates from /Applications/Xcode.app/Contents/Developer/Platforms/iPhoneOS.platform/Developer/Library/Xcode/Templates/Project Templates/iOS/Application/Cocoa Touch Application Base.xctemplate
- Paste into~/Library/Developer/Xcode/Templates/Custom. You may need to create the last folder (Custom) in the path.
- The name of the recently created folder will appear as a new section in the Create New Project wizard in Xcode. The name of the .xctemplate folder will appear as the template name under the new section. Name your template folder and templates as you would like them to appear in Xcode.
- Each template requires a unique identifier. To set this, open the TemplateInfo.plist file and change the value of Identifier key from com.apple.dt.unit.cocoaTouchApplicationBase to something new e.g. com.custom.customApplicationBase.
- You should be able to see your new template in Xcode at this point.
Method 2
The second method is to choose the ancestor(s) that you want to extend from the diagram above and create a new template based on those ancestor(s). The rest of this post is based on this method. We are going to extend the Cocoa Touch Application Base template per the following instructions:
- Create a new folder at ~/Library/Developer/Xcode/Templates/Custom and call it Custom Application Base.xctemplate
- Add a new file, called TemplateInfo.plist, to Custom Application Base.xctemplate folder with following contents:
This is telling Xcode the Identifier for new template, its Ancestors and a Description. You can change the values to suit your needs. If you try Xcode at this point, you will see a new template called Custom Application Base in the Create New Project wizard.
Adding Resources To Template
Having created a custom template for an empty project we can now move on to adding resources to the template. We generally have a UIViewController subclass that all the view controllers in the project inherit from and there are some things that we end up doing in this base class in almost all projects. We will use this as a sample resource that you may want to include as part of the custom template. Lets call it BaseViewController and it looks like follows:
Place these files (.h and .m) in the same folder as the TemplateInfo.plist file. These 2 files can be included in the project template by updating TemplateInfo.plist to the following:
Definitions
You must provide a Definitions dictionary for each resource that needs to be included. The key for each resource under Definitions is how the resource is referenced elsewhere in the template. Some configurable properties for resources are:
Path: We can specify Path to be where the resource is relative to TemplateInfo.plist file. This is the path to the source file.
Group: You can specify a new or existing Group and the resource will be added to the Group hierarchy as specified. The TemplateInfo.plist above will add ViewController.h/.m to the Base group under the Controller parent group.
Folder Structure: All resources included in the template by default get added to the same folder in the project as AppDelegate and main.m. However, any non-primitive iOS project will become hard to manage if all resources existed in one flat folder. Luckily for us, Xcode template has facilities to manage that for us. We must simply specify the resource Key with a relative path from the project folder. In the example above the BaseViewController files will be copied to ./{ProjectName}/{ProjectName}/Controllers/Base which matches our desired group structure in the project navigator exactly.
Nodes: The Definitions section of the plist file only provides information to Xcode about existence of resources. Simply specifying Definitions for all your resources will not include them in the template. The resources that need to be included must also be added to the Nodes section of their respective section. You can create one project template and provide resources for both Objective-C and Swift and the user can choose during project creation which set of resources they want. The important thing to note when specifying Nodes is that the each entry must correspond to the same value as was used as the Key for that resource in the Definitions.
Conclusion
You should now be able to create a simple project template from an existing empty template or even extend a more complex template using the concepts introduced in this post. This is a handy way of handling project creation and avoiding some repetitive processes. Xcode templates do present some challenges at the same time. Probably the most significant issue is the lack of documentation which makes it much harder to find a solution or even worse, to diagnose a problem in the template. Another important consideration must be that Xcode updates can potentially bring breaking changes to your custom templates and Apple is not bound to provide backward compatibility. Xcode templates alone will not provide a complete solution.
I discuss some advanced features in - Xcode Custom Project Templates: Advanced
Thank you for reading and please reach out if you have any feedback or want to discuss a technology product. If we can add value we are always happy to support.